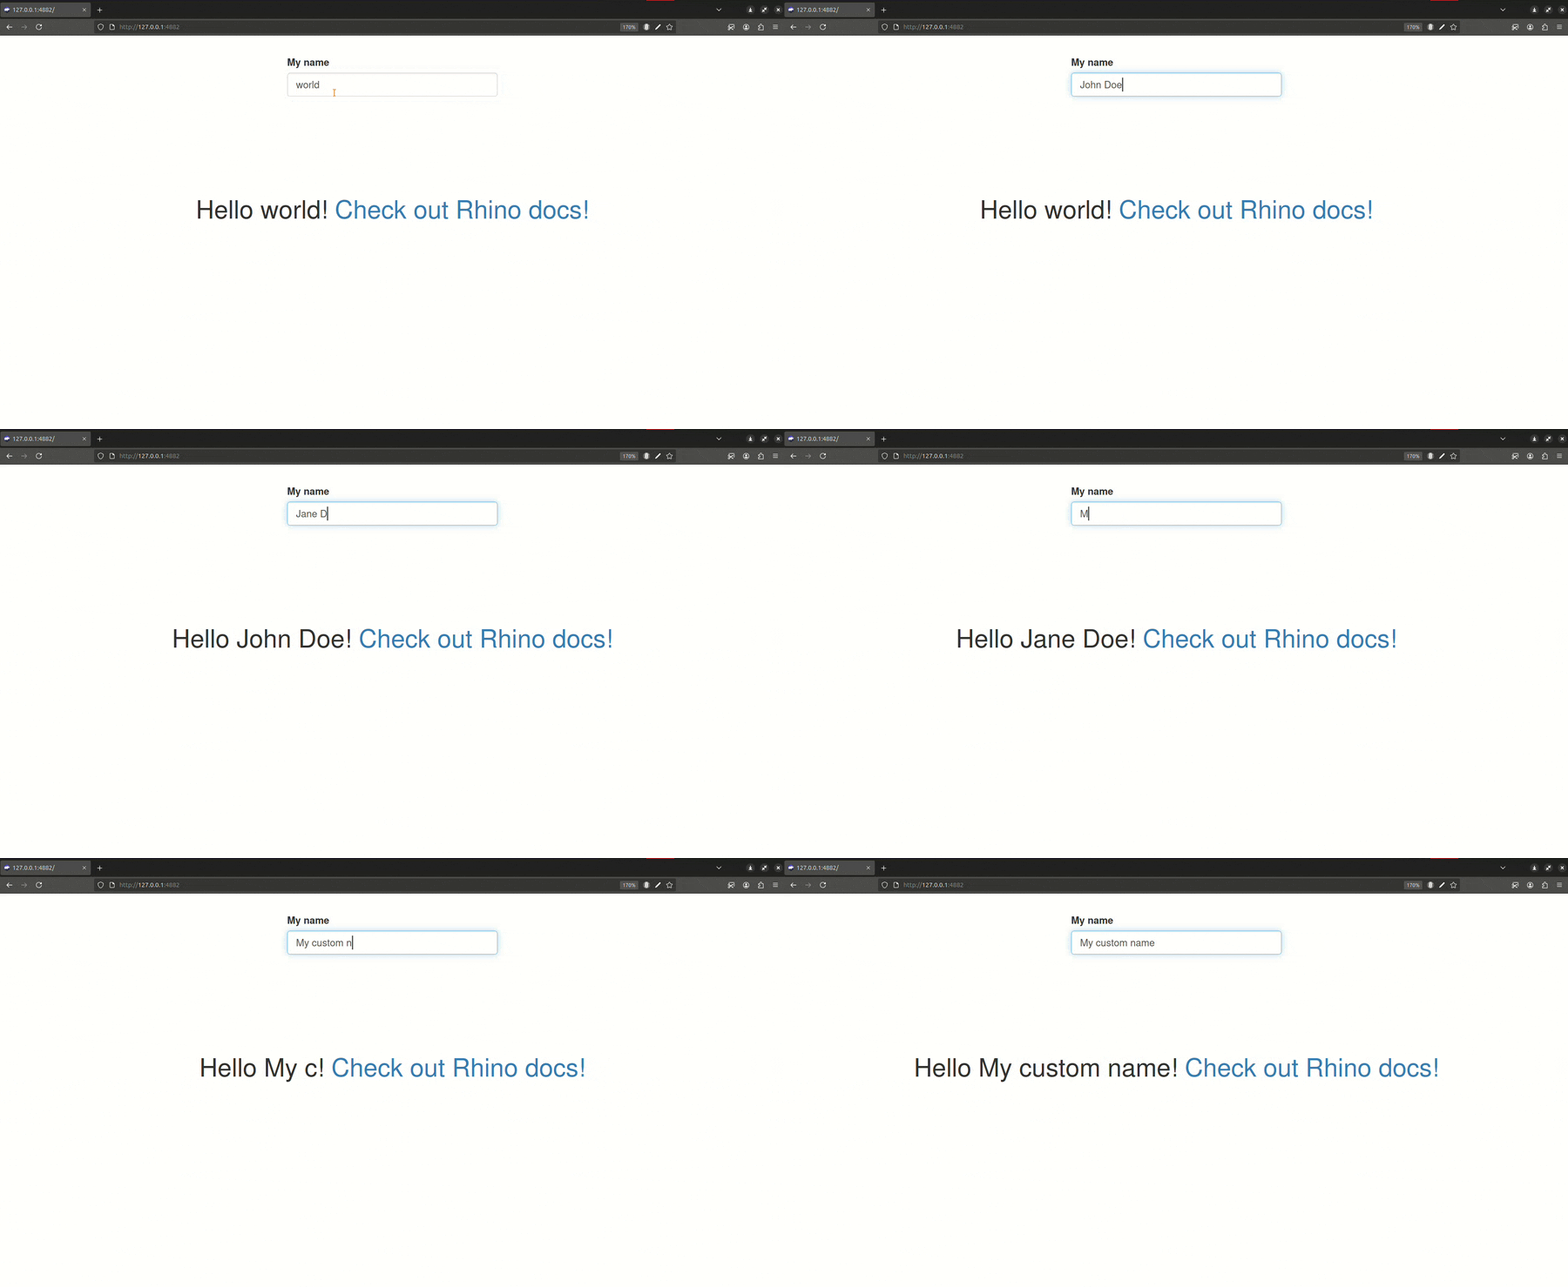
The shiny.telemetry package can be used with any Shiny application and in this guide we will show how to add it to a {rhino} application.
rhino is a package that provides a framework to build high quality, enterprise-grade Shiny apps at speed. It is designed to help you build Shiny apps that are scalable, maintainable, and robust.
Using {shiny.telemtry} with rhino is very
simple and it requires only a few lines of code just as any other
app.
Useful links:
- Creating your first Rhino app
- App structure in a Rhino application
- Write R code in Rhino
- Use
External Databases with
{shiny.telemetry}
Creating a new {rhino} application
Starting a new rhino application is as simple as
running the rhino::init() command. Learn more about
“Creating your first Rhino app” in
this guide.
The command creates a boilerplate folder structure for a
rhino application, where app/main.R contains
the UI and server logic. The application structure is best explained on
this “App
structure” documentation.
Before setting up shiny.telemetry in the application, let’s add a simple input element to the boilerplate code. Otherwise, the only events that will be tracked are the login, logout and the user’s browser version.
For this we will add a text input to the application and in the
sections below observe how it is being tracked by
{shiny.telemtry}.
Adding the code below to the app/main.R file will add a
text input and a “Hello world” message with the contents of the
input.
# app/main.R (replace with the following code)
box::use(
  shiny[
    bootstrapPage, div, moduleServer, NS, renderUI, tags, textInput, uiOutput,
    verbatimTextOutput,
  ],
)

#' @export
ui <- function(id) {
  ns <- NS(id)
  bootstrapPage(
    textInput(ns("name"), "My name", "world"),
    verbatimTextOutput(ns("text")),
    uiOutput(ns("message"))
  )
}

#' @export
server <- function(id) {
  moduleServer(id, function(input, output, session) {
    output$message <- renderUI({
      div(
        style = "display: flex; justify-content: center; align-items: center; height: 50vh;",
        tags$h1(
          tags$span(sprintf("Hello %s! ", input$name)),
          tags$a("Check out Rhino docs!", href = "https://appsilon.github.io/rhino/")
        )
      )
    })
  })
}
Using an existing {rhino} application
Alternatively, you can add shiny.telemetry to an existing rhino application by following the steps in the next sections.
Please note, that if there are no input elements in the application, the only events that will be tracked are the login, logout and the user’s browser version.
Setup {shiny.telemetry}
The following 4 steps are needed to start using shiny.telemetry for tracking inputs in the application:
- Import functions from shiny.telemetry using box;
- Add Javascript code to UI definition;
- Create a
Telemetryobject; - Start telemetry session attached to a Shiny session.
The first step is to install shiny.telemetry with:
rhino::pkg_install("shiny.telemetry")Import functions from shiny.telemetry
The rhino frameworks promotes the use of box to import functions from packages and internal modules. See the rhino documentation on how to write R code for more details.
The minimal setup for shiny.telemetry needs to import:
- Class for the chosen
DataStoragebackend (e.g.DataStorageLogFilefor a text-based storage,DataStorageMariaDBfor a MariaDB database, among others); - Class for the Telemetry function that will track all the events;
- Function to load the necessary Javascript code in the UI definition.
Any additional function that is being used, needs to be imported as
well. This can be done by adding the following code to the top of
app/main.R file on the package imports:
# app/main.R (top of file)
box::use(
  shiny[
    bootstrapPage, div, moduleServer, NS, renderUI, tags, textInput, uiOutput,
    verbatimTextOutput,
  ],
  # other packaage imports ...
  shiny.telemetry[DataStorageLogFile, Telemetry, use_telemetry],
)
Add Javascript code to UI definition
The next step is to call use_telemetry() function in the
root UI definition on app/main.R file to load the necessary
Javascript code.
Note that the id parameter needs to be passed to the
use_telemetry() function to ensure that the browser version
is tracked correctly, as well as the mechanism to track anonymous user
via client side cookies.
# app/main.R (change n `ui` function)
#' @export
ui <- function(id) {
  ns <- NS(id)
  bootstrapPage(
    use_telemetry(id),
    tags$div(
      style = "display: flex; justify-content: center; align-items: center; margin-top: 2em;",
      textInput(ns("name"), "My name", "world")
    ),
    verbatimTextOutput(ns("text")),
    uiOutput(ns("message"))
  )
}
Create Telemetry object
The next step is to create a Telemetry object that will
be used to track events in the app.
We recommend creating an instance of Telemetry on the
app/main.R and then start the telemetry session on the root
server function definition, just as shown in the code
below.
This will create a text file with the events tracked by shiny.telemetry. It is the simplest storage backend available and the file contains JSON data that can be easily read and processed.
To learn about other backends see the “Use External Databases with shiny.telemetry” guide.
Please note, that the values themselves are not tracked by default
and need to be enabled by setting the track_values
parameter to TRUE in the start_session()
method. In this example we are enabling them to help demonstrate the
capabilities of shiny.telemetry.
# app/main.R (create telemetry object and initialize in a session)
telemetry <- Telemetry$new(
  app_name = "rhino_app",
  data_storage = DataStorageLogFile$new("local_file.txt")
)

#' @export
server <- function(id) {
  moduleServer(id, function(input, output, session) {
    telemetry$start_session(track_values = TRUE)
    # Server logic ...
  })
}
The telemetry$start_session()
call can be customized to enable/disable different types of events and
can be further extended to include/exclude input ids. See the Guide
on tracking specific inputs for more details.
The application is now ready to track the input changes, login, logout and browser version. Start the application and test it out yourself.
shiny::runApp() # Start the application and change inputs 
Access the events
The shiny.telemetry package provides a default
dashboard to visualize the events tracked by the application. In this
example we will use the local_file.txt that has been
configured in the application.
To start the dashboard run the code below after installing the
suggested packages
(renv::install("semantic.dashboard", "shinyjs", "plotly", "timevis", "DT"))
# Required suggested packages:
#  renv::install("semantic.dashboard", "shinyjs", "plotly", "timevis", "DT")
library(shiny.telemetry)

data_storage <- DataStorageLogFile$new("local_file.txt")
analytics_app(data_storage = data_storage)
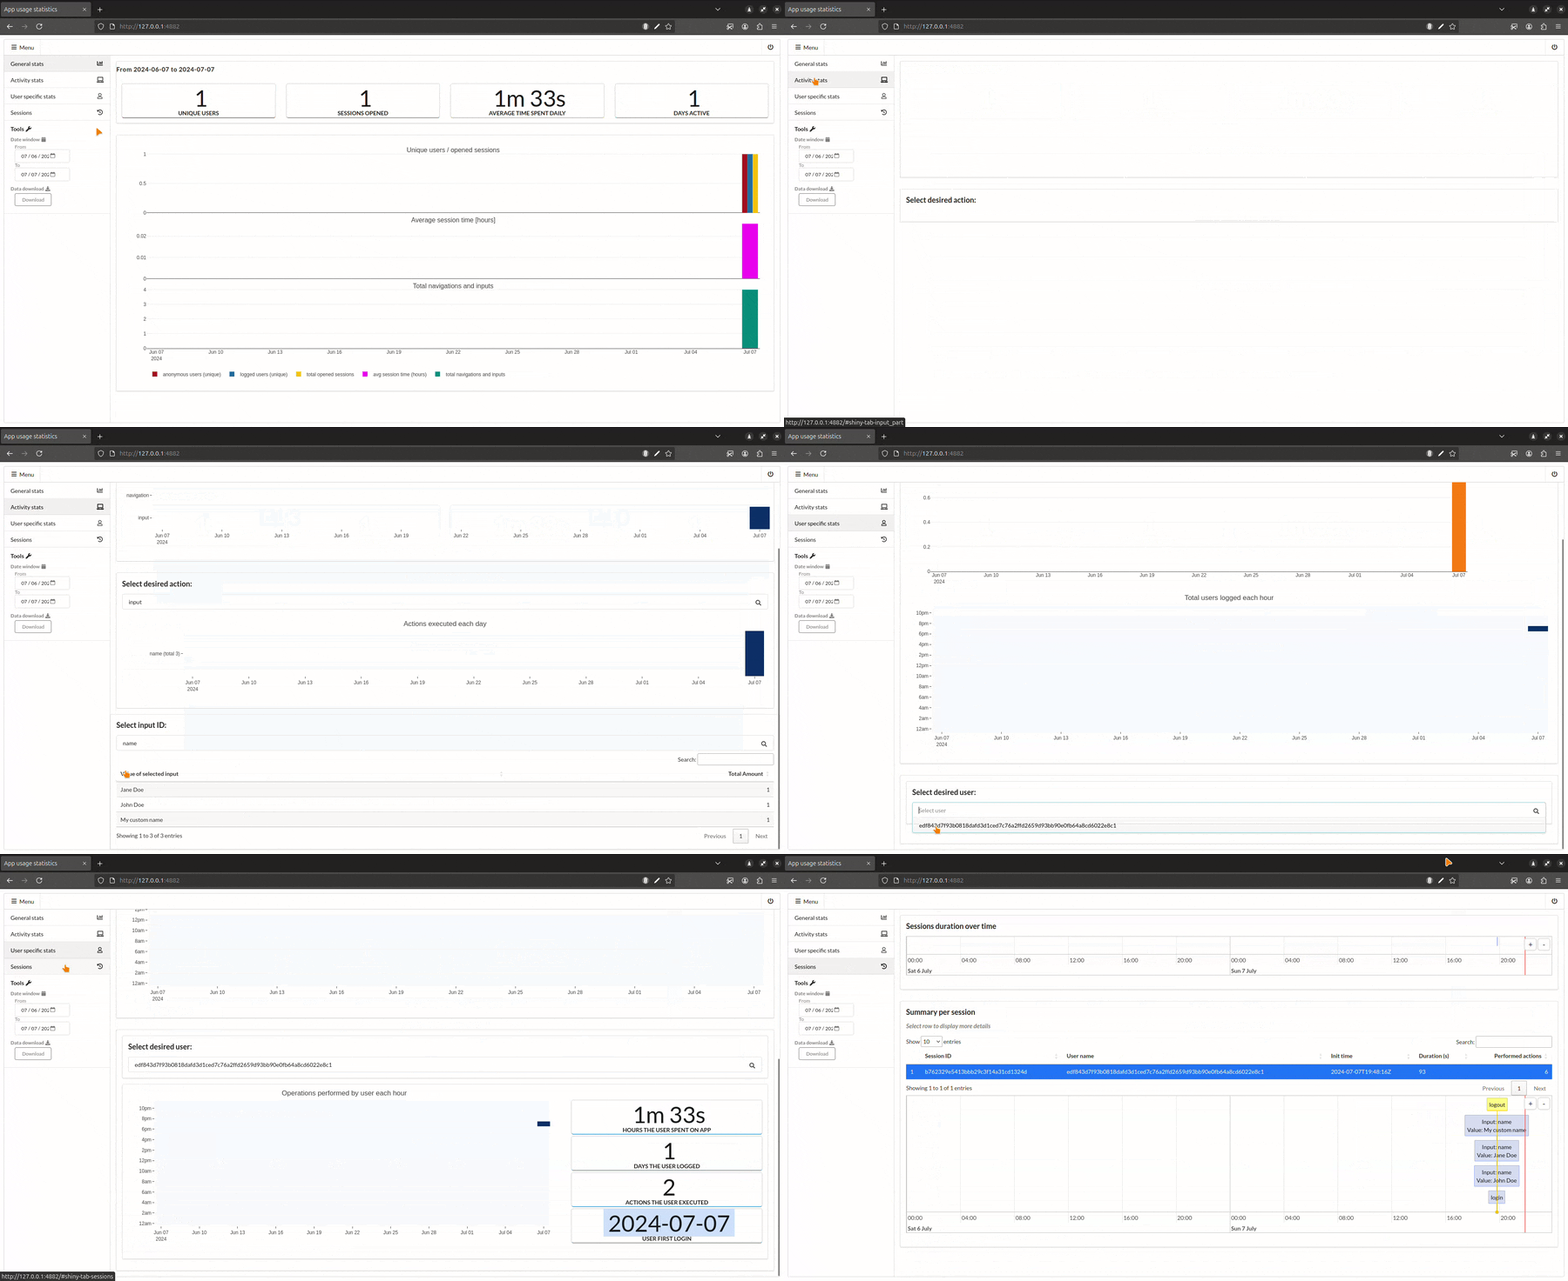
This will start a dashboard that will show the events tracked by the application. It shows:
- General stats with the number of events, unique users and average session;
- Activity stats with event data by input id;
- User stats with session by same user
- Returning anonymous users are tracked by client side cookies;
- Session stats with duration and activity per user session.

Other examples for the different backends can be found in the
inst/examples folder of the package.
Alternative methods to access event data
The event data can be accessed directly, either via the
DataStorage API in shiny.telemetry or by
accessing the data directly in the backend.
The DataStorage API has 2 main functions to read and
write data to the respective backend.
-
read_event_data()used to read data from the backend and returns a data frame with the events data;- Optionally parameters can be used to limit the results by data range and application name;
-
insertused to write new events to the backend.
To read all the data being tracked in this example we can run the following code:
library(shiny.telemetry)
data_storage <- DataStorageLogFile$new("local_file.txt")
data_storage$read_event_data()| app_name | type | session | username | id | value | time | date |
|---|---|---|---|---|---|---|---|
| rhino_app | login | 61dd2c… | 9be81b… | NA | NA | 2025-07-14 09:13:35 | 2025-07-14 |
| rhino_app | input | 61dd2c… | NA | name | John Doe | 2025-07-14 09:13:35 | 2025-07-14 |
| rhino_app | input | 61dd2c… | NA | name | Jane Doe | 2025-07-14 09:13:35 | 2025-07-14 |
| rhino_app | input | 61dd2c… | NA | name | My custom name | 2025-07-14 09:13:35 | 2025-07-14 |
| rhino_app | logout | 61dd2c… | 9be81b… | NA | NA | 2025-07-14 09:13:35 | 2025-07-14 |
Conclusion
To use shiny.telemetry with rhino, you only need to make 4 minor adjustments that adds six lines of code (with default options). It is as easy as doing it with any other Shiny application.
The setup allows to access all of shiny.telemetry functionality to write events to a data storage backed and it will write 4 types of events:
- Login timestamp with username (if available);
- Browser user agent;
- Logout timestamp when the session ends;
- All input changes.
To learn how to use Database backends you can refer to the “Use External Databases with shiny.telemetry” guide.
Appendix: Use an External Database
The storage backend can be swapped between the JSON log file used
above to an external database by just changing the
data_storage parameter when initializing
{shiny.telemetr}. To learn how to use the different
available Database backends you can refer to the “Use
External Databases with shiny.telemetry” guide.
In this section we will show how to use PostgreSQL, which is one of the supported databases in a Rhino application. Using any of the others is similar.
The only necessary modification in the code is to replace the
DataStorageLogFile with DataStoragePostgreSQL
and provide the necessary connection information.
However, we recommend using environment variables to store sensitive
information, such as passwords, and avoid storing them directly in the
code. As such, we will use the config.yml and
.Renviron files to keep this information safe.
The first step is changing the data storage backend in
app/main.R file.
# app/main.R (change the data storage backend)
telemetry <- Telemetry$new(
  app_name = "rhino_app",
  data_storage = DataStoragePostgreSQL$new(
    user = config$get("postgres_user"),
    password = config$get("postgres_pass"),
    hostname = config$get("postgres_host"),
    port = config$get("postgres_port"),
    dbname = config$get("postgres_dbname"),
    driver = "RPostgreSQL"
  )
)
Notice that we are using the config package to read
the secrets from the config.yml file. Therefore the next
step is to import the config package with
box in the app/main.R file.
# app/main.R (top of the file)
box::use(
  config, # Adds config package that reads config.yml file at the root of the project
  shiny[
    bootstrapPage, div, moduleServer, NS, renderUI, tags, textInput, uiOutput,
    verbatimTextOutput,
  ],
  # other packaage imports ...
  shiny.telemetry[DataStorageLogFile, Telemetry, use_telemetry],
)
The config.yml can be configured to read the secrets for
the environment, as well allowing for different configurations for
different environments. It is safe to commit this file to a repository
as it does not contain any sensitive information itself.
# config.yml
default:
  rhino_log_level: !expr Sys.getenv("RHINO_LOG_LEVEL", "INFO")
  rhino_log_file: !expr Sys.getenv("RHINO_LOG_FILE", NA)
  postgres_user: !expr Sys.getenv("POSTGRES_USER", NA)
  postgres_pass: !expr Sys.getenv("POSTGRES_PASS", NA)
  postgres_host: !expr Sys.getenv("POSTGRES_HOST", NA)
  postgres_port: !expr Sys.getenv("POSTGRES_PORT", 5432)
  postgres_dbname: "shiny_telemetry"

staging:
  postgres_dbname: "shiny_telemetry_stg"

production:
  postgres_dbname: "shiny_telemetry_prd"
The last change is on the .Renviron file that will keep
the secrets safe and avoid storing them directly in the code. As long as
this file is not committed to the repository, the secrets will be
safe.
When deploying an application to POSIT Connect or ShinyProxy, the secrets can be set as environment variables in the deployment configuration.
# .Renviron
POSTGRES_USER=postgres
POSTGRES_PASS=mysecretpassword
POSTGRES_HOST=127.0.0.1
See the Rhino guide to “Manage secrets and environments” for more details on the best practices to manage secrets and environments.

